
Sampling procedure#
Note
The collection of a seawater sample for oxygen analysis from the Niskin should be done as quickly as possible after the water sampler reaches the surface.
Danger
Wear gloves and goggles when adding the reagents to the sample!
The first consideration must be given to sampling from the first triggered (deepest) Niskin due to the fact that the sample water has been in this bottle the longest, and undergone the greatest changes in Pressure and Temperature. Then consideration must be given to the warming of the water on deck in the sampler which can result in outgassing and loss of oxygen. Once water sampling from a Niskin begins a headspace develops inside the sampler and gas exchange between that headspace gas and the water in the sampler will begin immediately. For this reason a strict hierarchy has been established for the order in which water samples for gas analyses are drawn from the sampler. Those gases that are likely to experience the greatest contamination from the headspace, are drawn infrequently, or are very expensive or labor intensive to analyze are drawn first. The order that is observed on the CLIVAR/Repeat Hydrography cruises is CFCs, helium, noble gases (argon and xenon), O17, oxygen and pCO2. It is just as important that all the sampling for dissolved gases happen as quickly as possible once the water sampler arrives on deck.
Ensure that the Niskin water sampling bottles are properly closed and that there are no leakages from them. Check that the valve on top of the Niskin bottle is properly closed (check it before the CTD rack is launched). Water leaking from the tap when it is opened or from the bottom cap in the Niskin bottle indicates that the bottle has a leakage, a sample from a leaking bottle should be either discarded and resampled or given a remark in the Hydrographical form. The water from this sample depth might have been mixed with water from other depths or been exposed to air.
Fill the CTD Niskin log with the bottle number, the station number, the depth before sampling and the approximative Oxygen concentration.
Start tapping the bottle containing water from the deepest position.
Confirm that the precalibrated Pyrex flask and stopper is a matched pair. If a flask or stopper is broken, do not replace one or the other.
Connect the soft silicone tube, about 20cm long to the nipple of the petcock on the water sampler, open the air vent on the top of the Niskin bottle and push in to start the flow of water. Dislodge any air bubbles within the tubing by squeezing or tapping with the output point to the sky.
Rinse the sample bottle twice to remove any residual reagent from a previous analysis.
Fill the sample flask by inserting the drawing tube all the way to the bottom of the flask. Fill the flask smoothly to minimize turbulence and aeration. Restricting the flow at the beginning by squeezing the drawing tube helps to minimize the bubbles that will otherwise form if the flow is too fast. This can also be assisted by commencing the “sample fill” with the bottle starting on roughly a 45° angle and as the fill progresses, move the flask to the upright position. Pay attention to how long the flask takes to fill. You should allow the flask to overflow for 2-3 times the time it took the flask to fill. This period of overflow is critical to obtaining a high quality sample. Your colleagues will complain about the waste of sample but it is critical to the precision of the oxygen analysis. The flask should be filled all the way to the top. Do not stopper the flask at this stage.
while the flask is filling and overflowing insert the thermistor of a digital temperature meter into the flask and take a reading.
Add the pickling reagents: add 1ml of the Reagent A (MnCl2) and then 1ml of the Reagent B (NaI/NaOH) with the dispenser under the water surface. 2ml of sample equal to the volume of the two reagents will be lost as the stopper is inserted. This will be taken into account in the calculations.
This step sounds simple but is a frequent source of error in the analysis. They may discharge a small quantity of air (as bubbles) so it can be appropriate to discharge a small amount to waste and draw up to refill the dispenser. Immerse the dispensing tip fully and dispense the reagent slowly and not too forcefully. The objective is to get the reagent to the bottom of the flask without too much mixing.
The reagent A and B are transferred in to two 250ml plastic bottles labeled A and B in the red rack. The reactants are then filled into two Automatic dispensers with replaceable syringes. The syringes have a volume of 25 ml and the dispenser must be adjusted to give 1ml of reactant, the number on top of the pipette need to be 2. The automatic pipettes are labeled A and B and adjusted to the correct volume (1.0 mL) (according to the user manual user manual and the size of the syringe). Make sure not to mix the syringes to avoid contamination. It is important that the syringe does not contain air and does not drip. If so, replace the syringe. Remember to wipe the tip before the syringe is refilled to avoid contamination of the reactants (Winkler A and B).
Note: you can also use a 1ml pipette and two tips, one for each reagent.
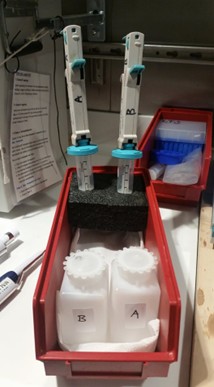
Figure 2: Material to dispense reagent A and B during sampling, Picture: Claire Mourgues
Add the stopper and shake.
Stopper the flask being careful not to trap any air under the stopper.
Shake the flask vigorously for several seconds to thoroughly mix the reagents with the sample, hold well the stopper. If the sample and reagents are not be mix properly, you can obtain erratic and false results.
Keep samples flask in the wood box and put the box in the grey cupboard next to the titrator. The wood box needs to be in the same room than the titrator (the sample will be at the same temperature than the thiosulfate). After 1.5-2 hours you can analyze your samples. A second shaking of the flasks is recommended after approximately 30 minutes to ensure that all the oxygen in the flask has fully reacted with the reagents.
Important
The I2 formed are sensitive to the light! So, you need to be very careful with your sample: Keep your sample, reagent blank and standardization thiosulfate in darkness.
Important
You can immerge the bottles in water. This creates a seal and prevents air from entering the flask. This step is especially important for 2 prime reasons; the first being dry environments such as well air-conditioned ships, and the second being that warmer samples will still be contracting as they cool to ambient. If you fail to do this, bubbles will form in the flask during the wait before they are analyzed and the oxygen concentration will be several µ moles higher than it should be, and this cannot be corrected for as it is not consistent. However, if the water seal is maintained, the flasks can be stored for many days without any noticeable change in concentration.
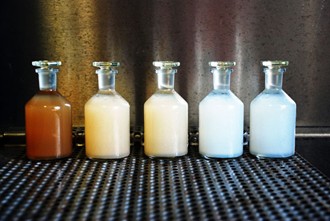
Figure 3: Oxygen sampling bottles after adding Winkler reagents A and B. High conc. to the left, low conc. to the right. Notice how the bottles and the caps are designed to avoid air bubbles. Picture: Lars-Johan Naustvoll